
Rate limiting is one of those things that sounds boring until your server goes down at 2am because someone spammed your API. Every backend developer hits this wall eventually. In this post we'll go from the basics, why rate limiting even exists, all the way to the five algorithms that actually power it under the hood.
Why Do We Need Rate Limiting?
Let's start from scratch.
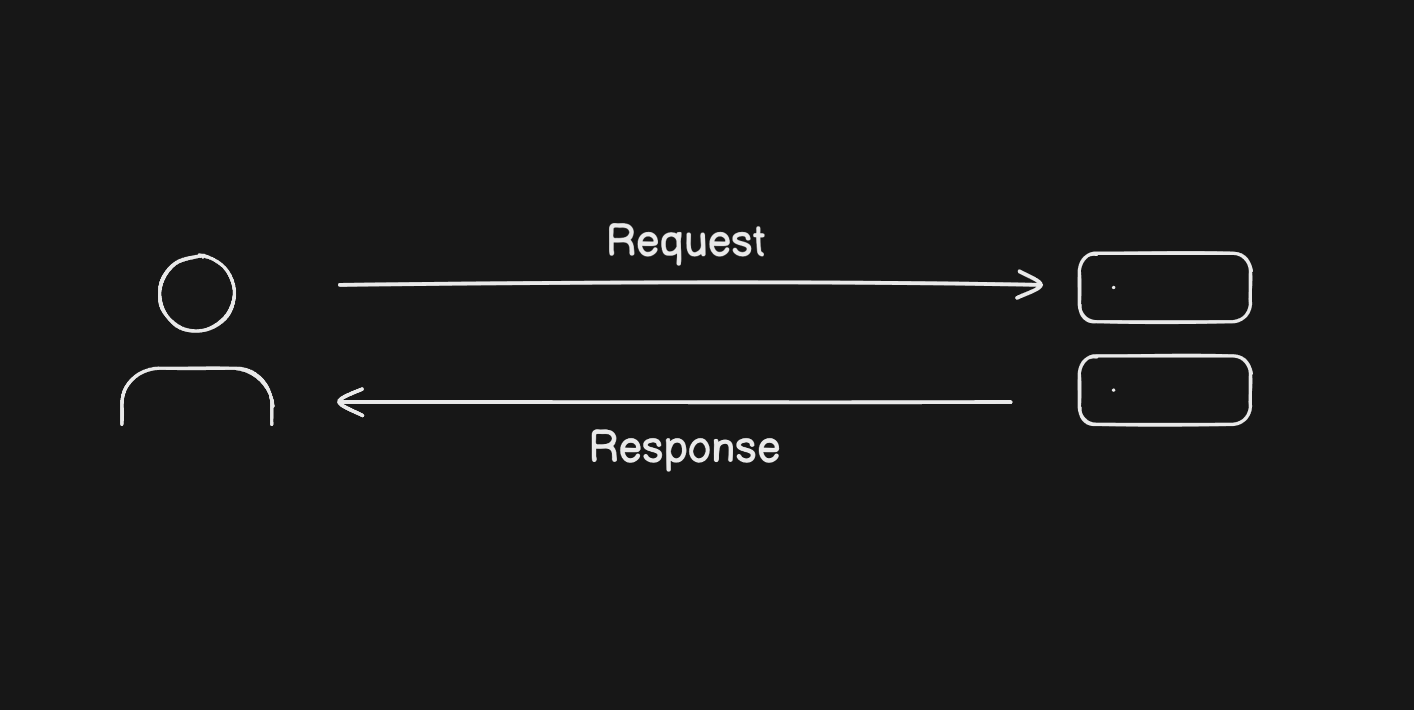
Every time you open an app and tap something, your device sends an HTTP request to a server. The server does its thing and sends back a response. That's the whole story at a basic level.
Now here's the thing, servers have limits. A machine with 2 vCPUs and 4GB of RAM can only take so much before it starts struggling. Say your server can handle around 100 requests per minute comfortably. Hit it with more than that and response times go up, errors start showing up, and if it gets bad enough, the whole server dies.
The tricky part is you can't tell users to slow down. You can't stop a bot attack or predict a traffic spike. What you can do is control how many requests actually reach your server.
That's the entire job of a rate limiter.
What Is a Rate Limiter?
A rate limiter sits between your users and your server. You give it a rule, something like "no more than 100 requests per minute per user" and it enforces that.
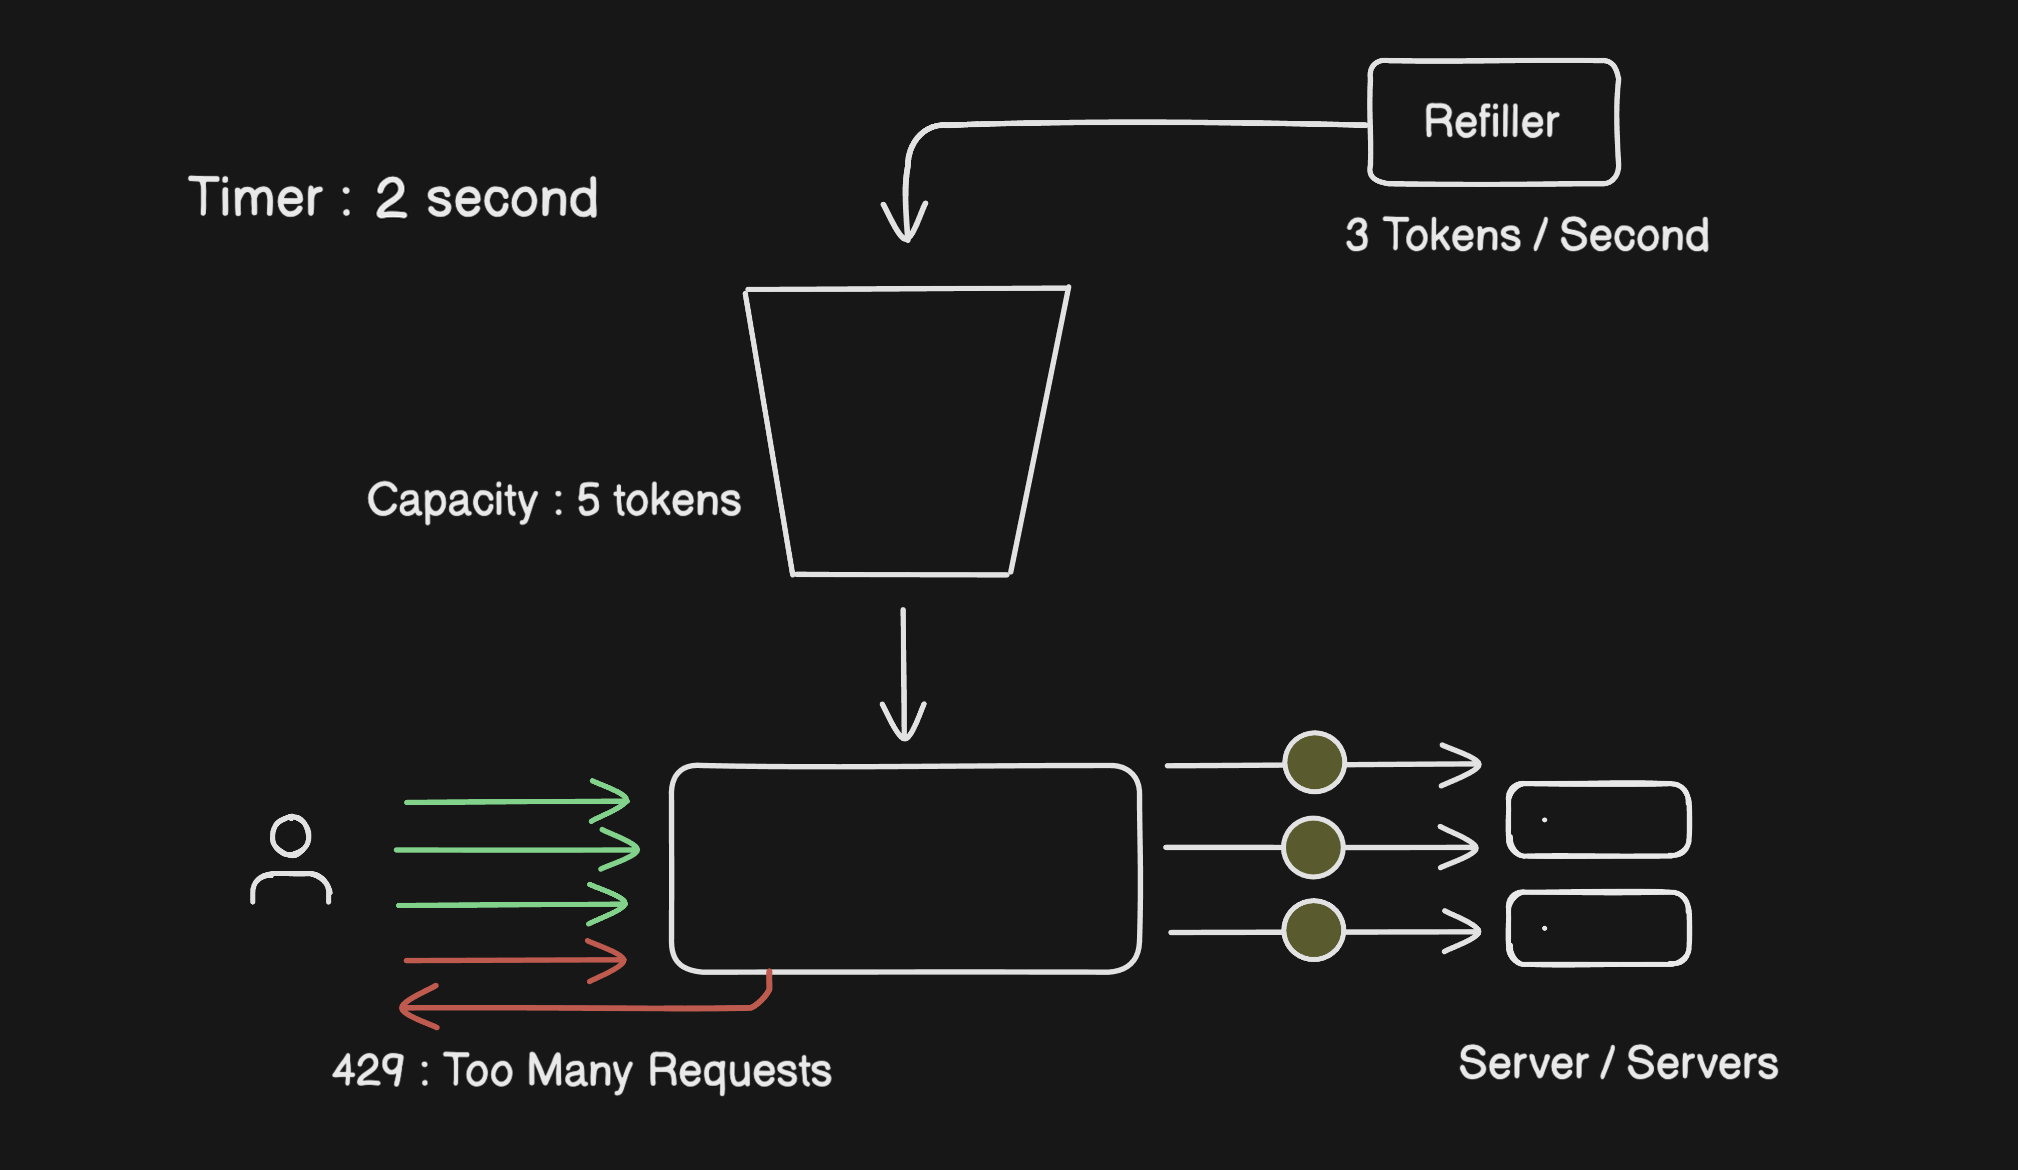
When request 101 shows up within the same minute, the rate limiter doesn't even let it near the server. It sends the user back an HTTP 429 Too Many Requests error right then and there.
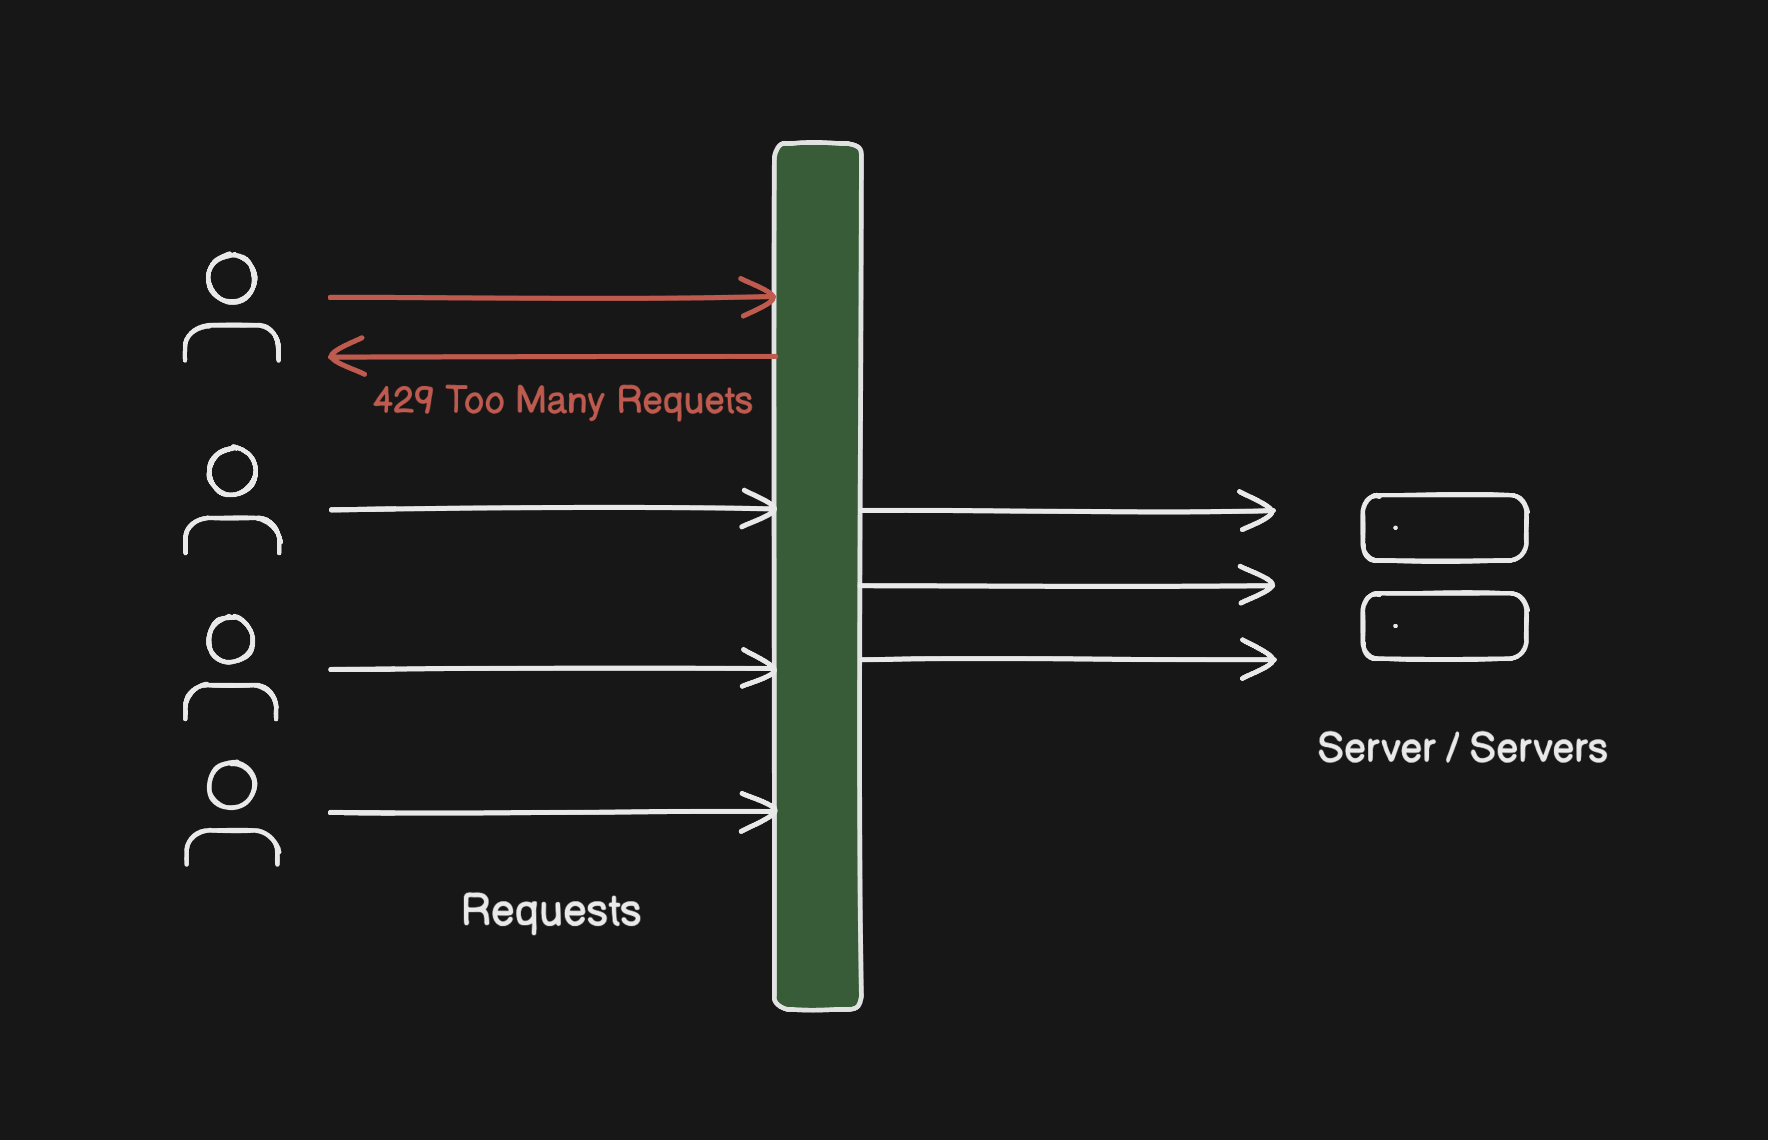
This is called dropping the request. The server is completely unaware it ever happened. Your infrastructure stays stable no matter what's going on outside.
The Algorithms Behind Rate Limiting
Here's where it gets interesting. The concept is simple but the implementation details matter a lot. Different algorithms handle traffic in different ways and make different trade-offs. Let's go through all five.
1. Token Bucket Algorithm
This is probably the most widely used algorithm and once you get the mental model, it clicks immediately.
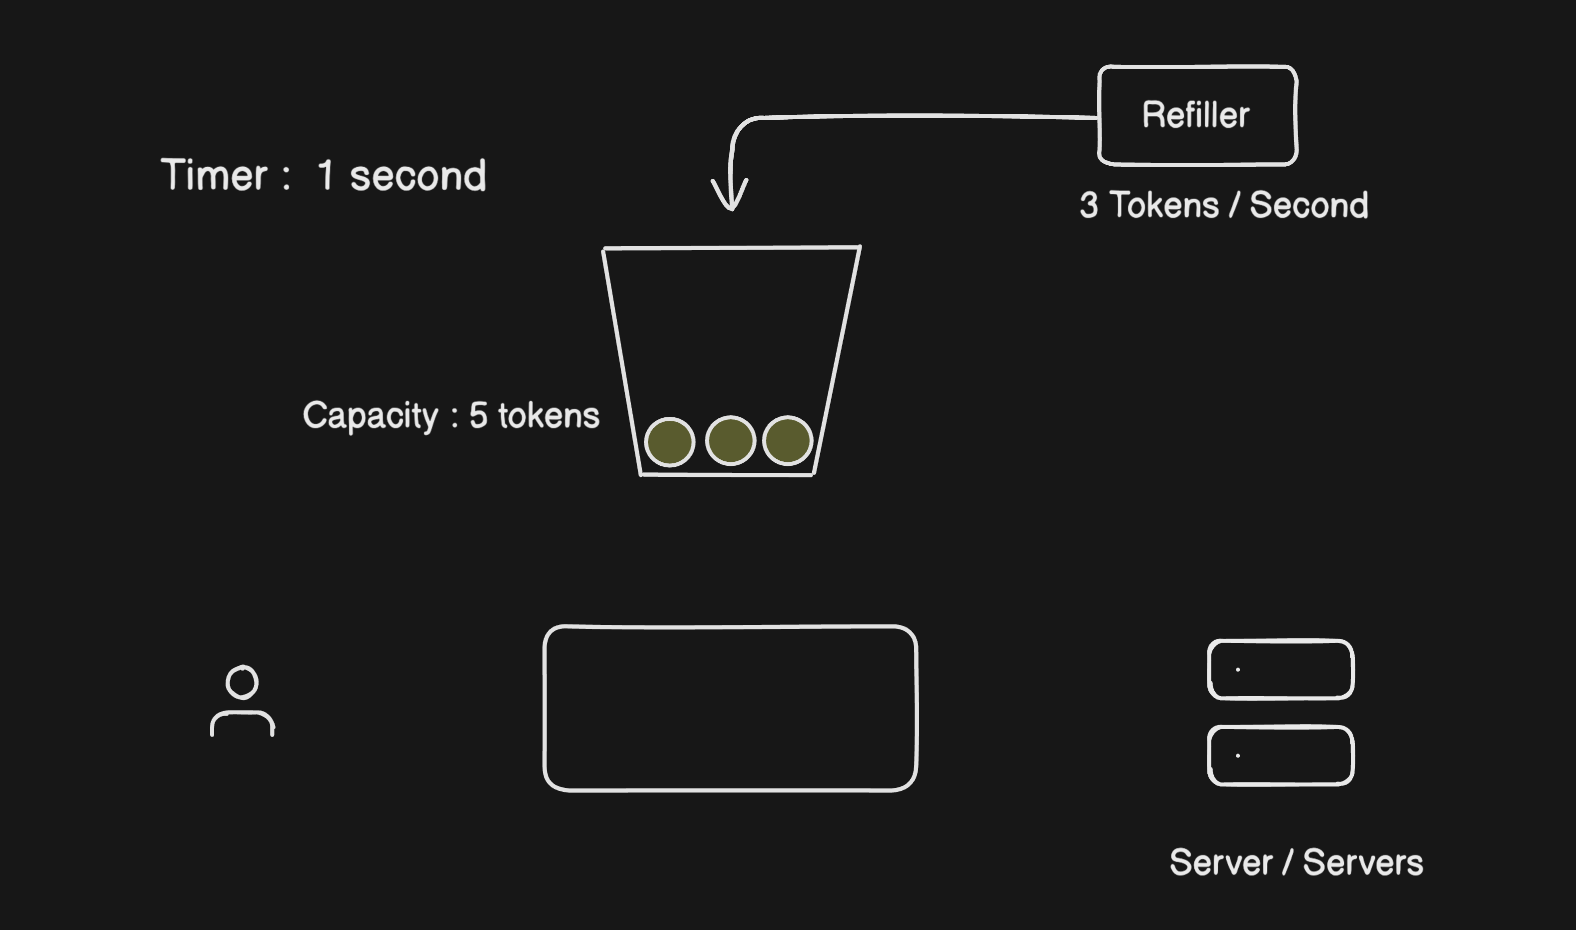
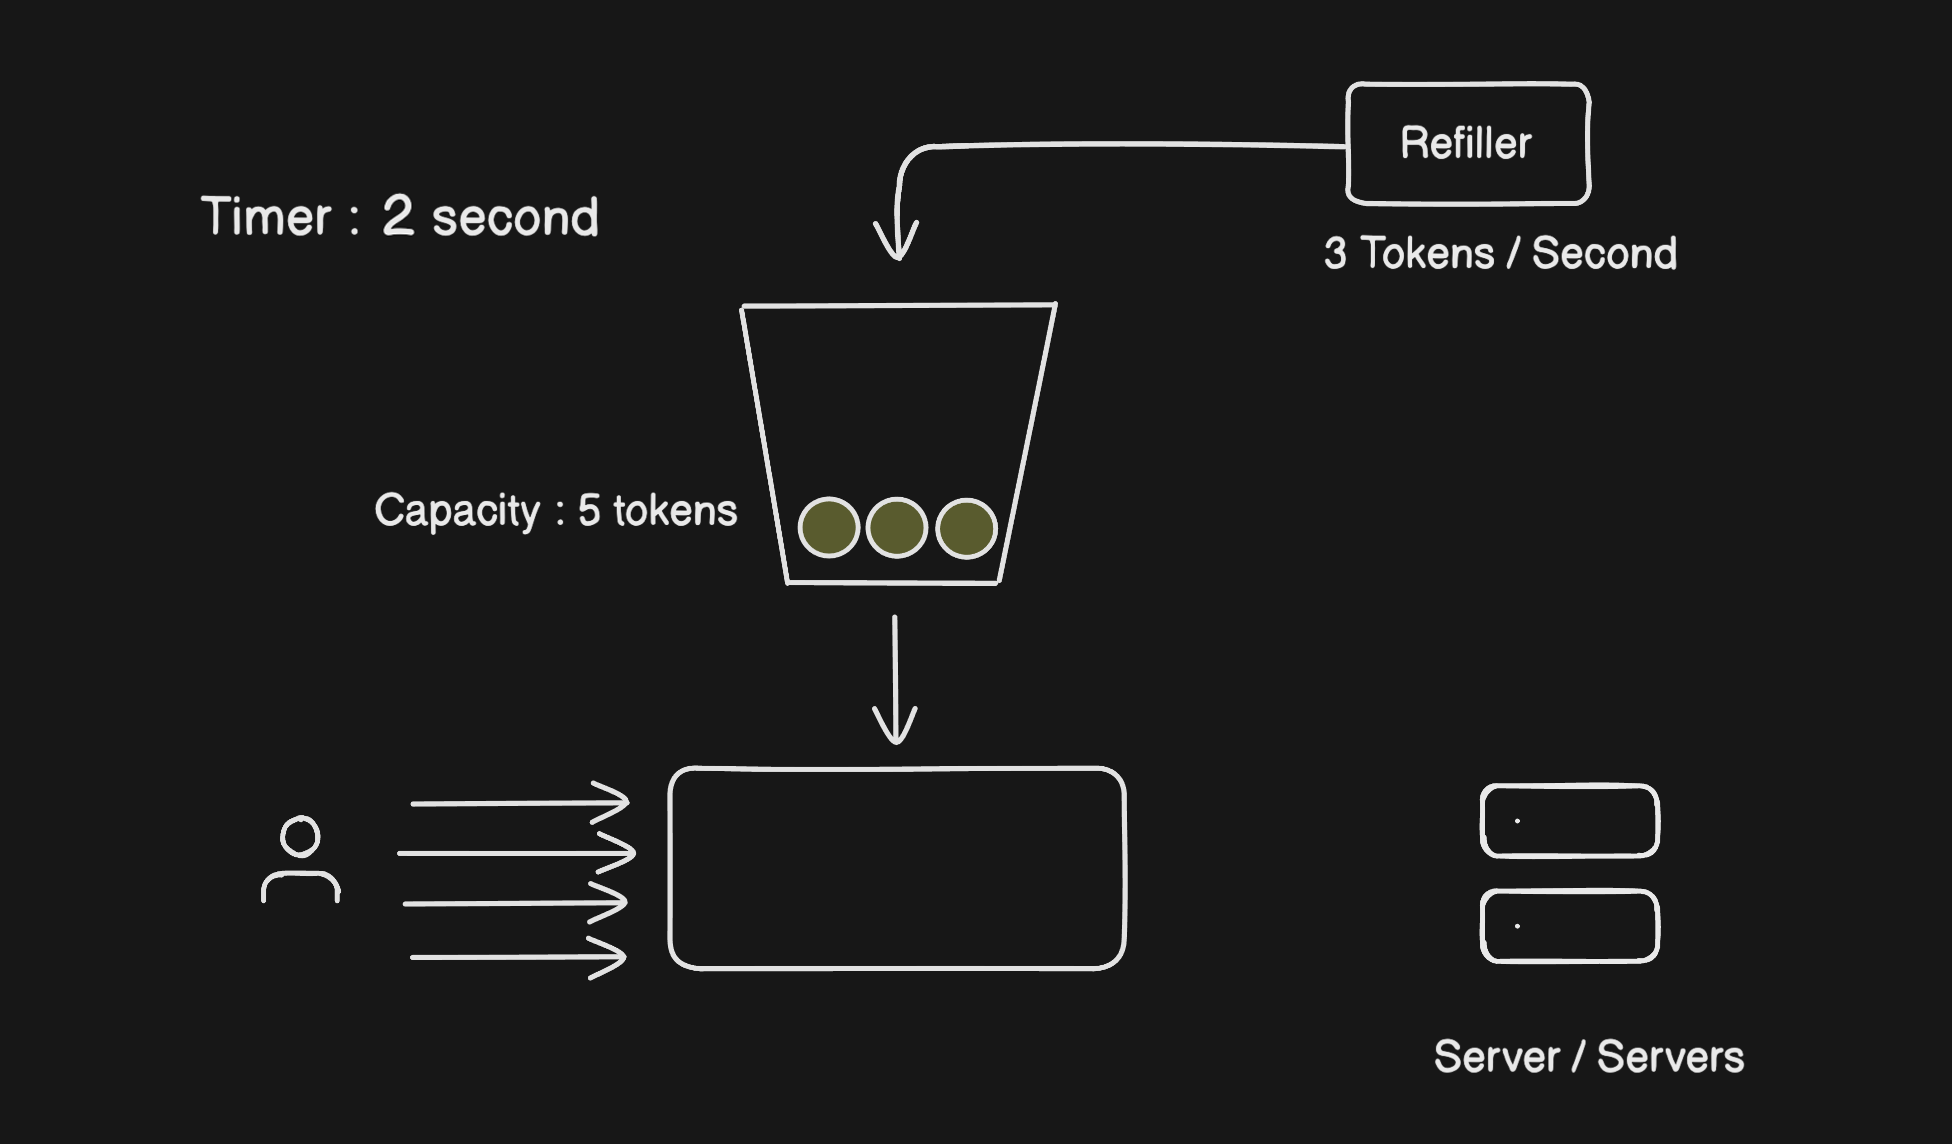
You have three things: a bucket with a max capacity, a refiller that adds tokens at a fixed rate, and the rate limiter that checks the bucket on every request.
Picture a bucket that holds 10 tokens. The refiller drops in 2 tokens every second. Every time a user makes a request, the rate limiter takes one token out and lets the request through. No token available? The request gets a 429 and goes nowhere.
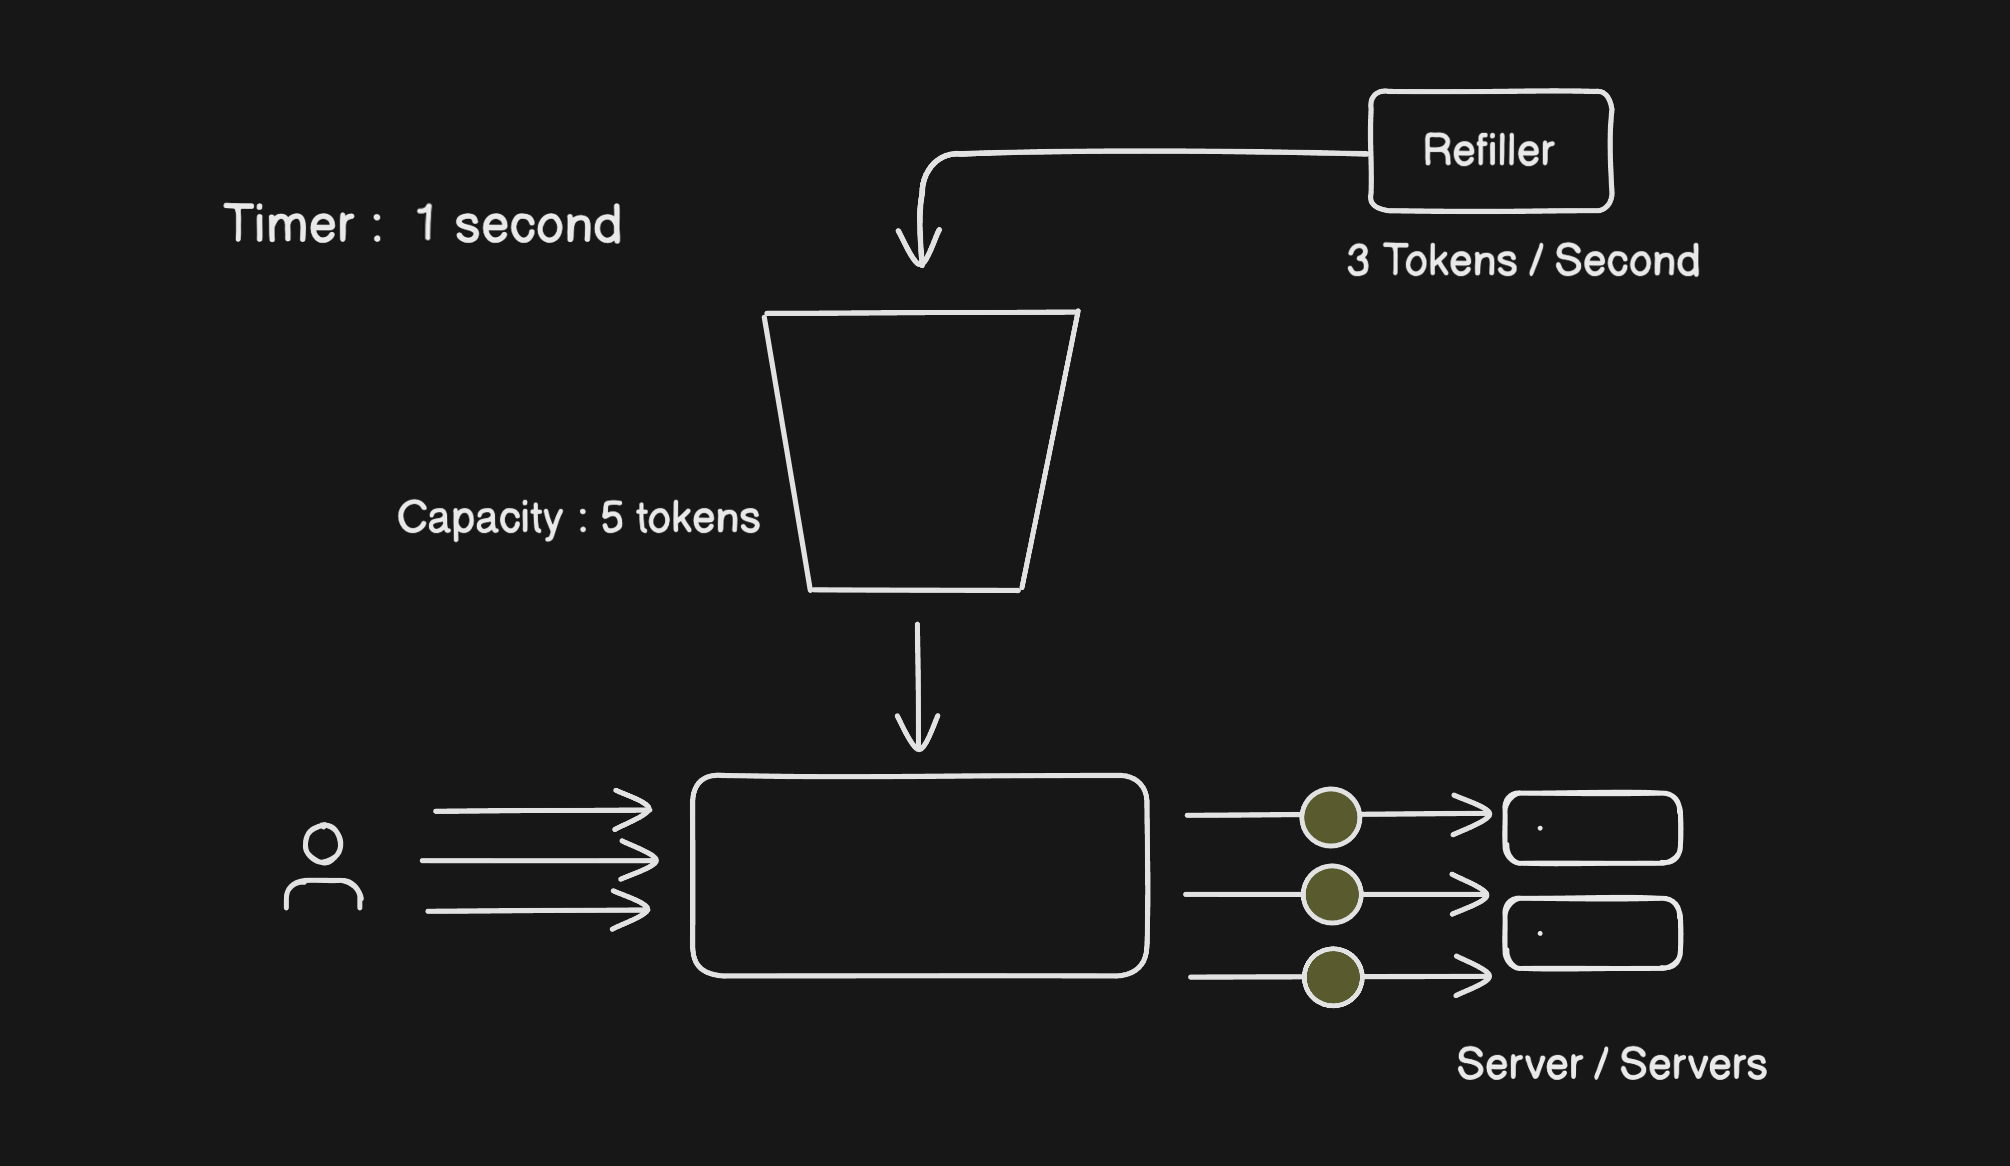
What makes this algorithm nice is that it naturally handles bursts. If a user goes quiet for a bit, tokens stack up. When they come back active, they've got a few banked tokens ready to go. That matches how real users actually behave, which is why this algorithm feels fair.
The two things you need to tune are the bucket size and the refill rate. Get those right for your server's capacity and you're in good shape.
2. Leaky Bucket Algorithm
The Leaky Bucket does the opposite of Token Bucket in one key way, it doesn't care about bursts. It irons everything out into a smooth, constant stream.
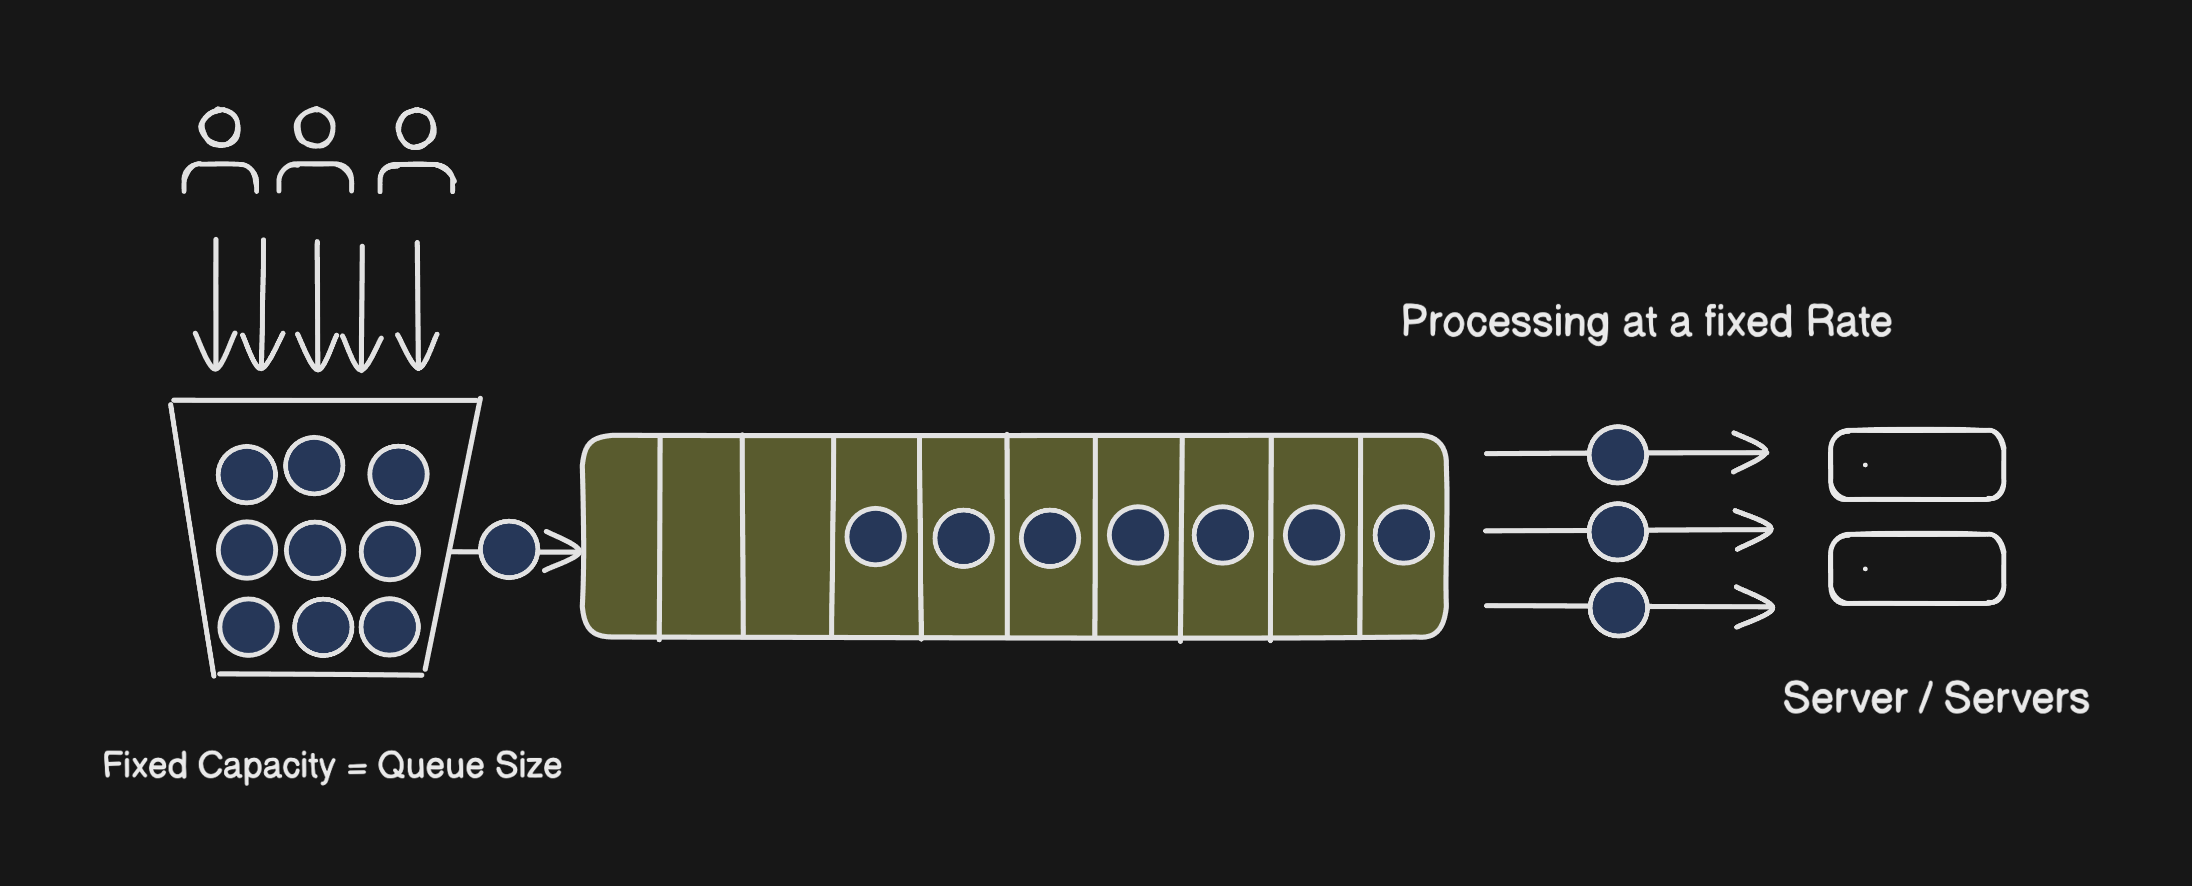
You have a bucket that collects incoming requests, and a FIFO queue that drains them to the server at a fixed rate.
Think of it literally like water pouring into a bucket, leaking out at the bottom at a steady drip. Requests come in from the top (as fast or slow as users send them) and the bucket processes them one by one at a set pace lets say, 5 requests per second, in the order they arrived (FIFO).
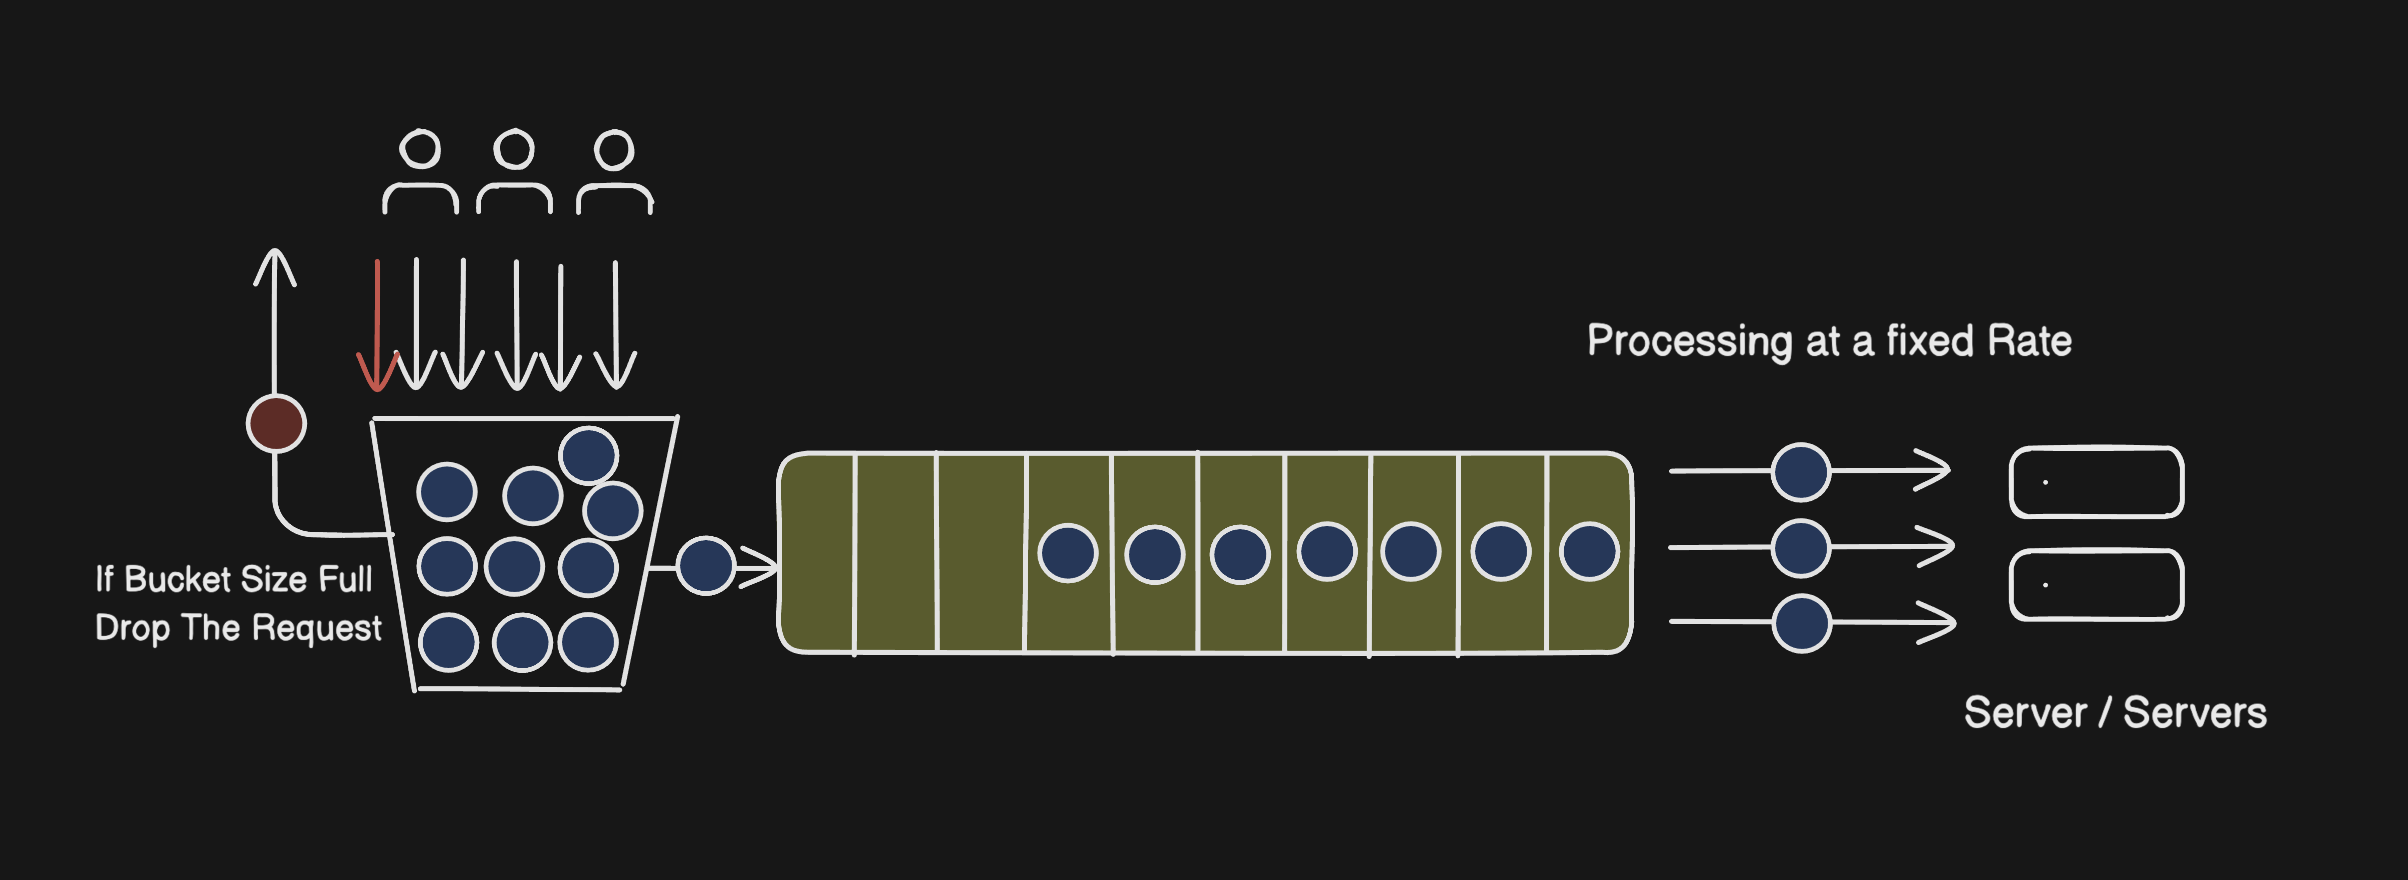
If requests keep piling in faster than the bucket can drain, it eventually fills up. At that point new requests are rejected at the bucket level itself.
This works really well when you need your server to receive traffic at a consistent pace regardless of what's happening upstream, payment systems, video pipelines, anything where a sudden spike would cause downstream problems.
3. Fixed Window Counter Algorithm
Fixed Window is the simplest one to understand and implement. Each unit of time (say, 1 second) is its own independent window with its own counter. The limit is per window. Counter hits the cap? Remaining requests in that window are rejected. New window starts, counter resets, life goes on.
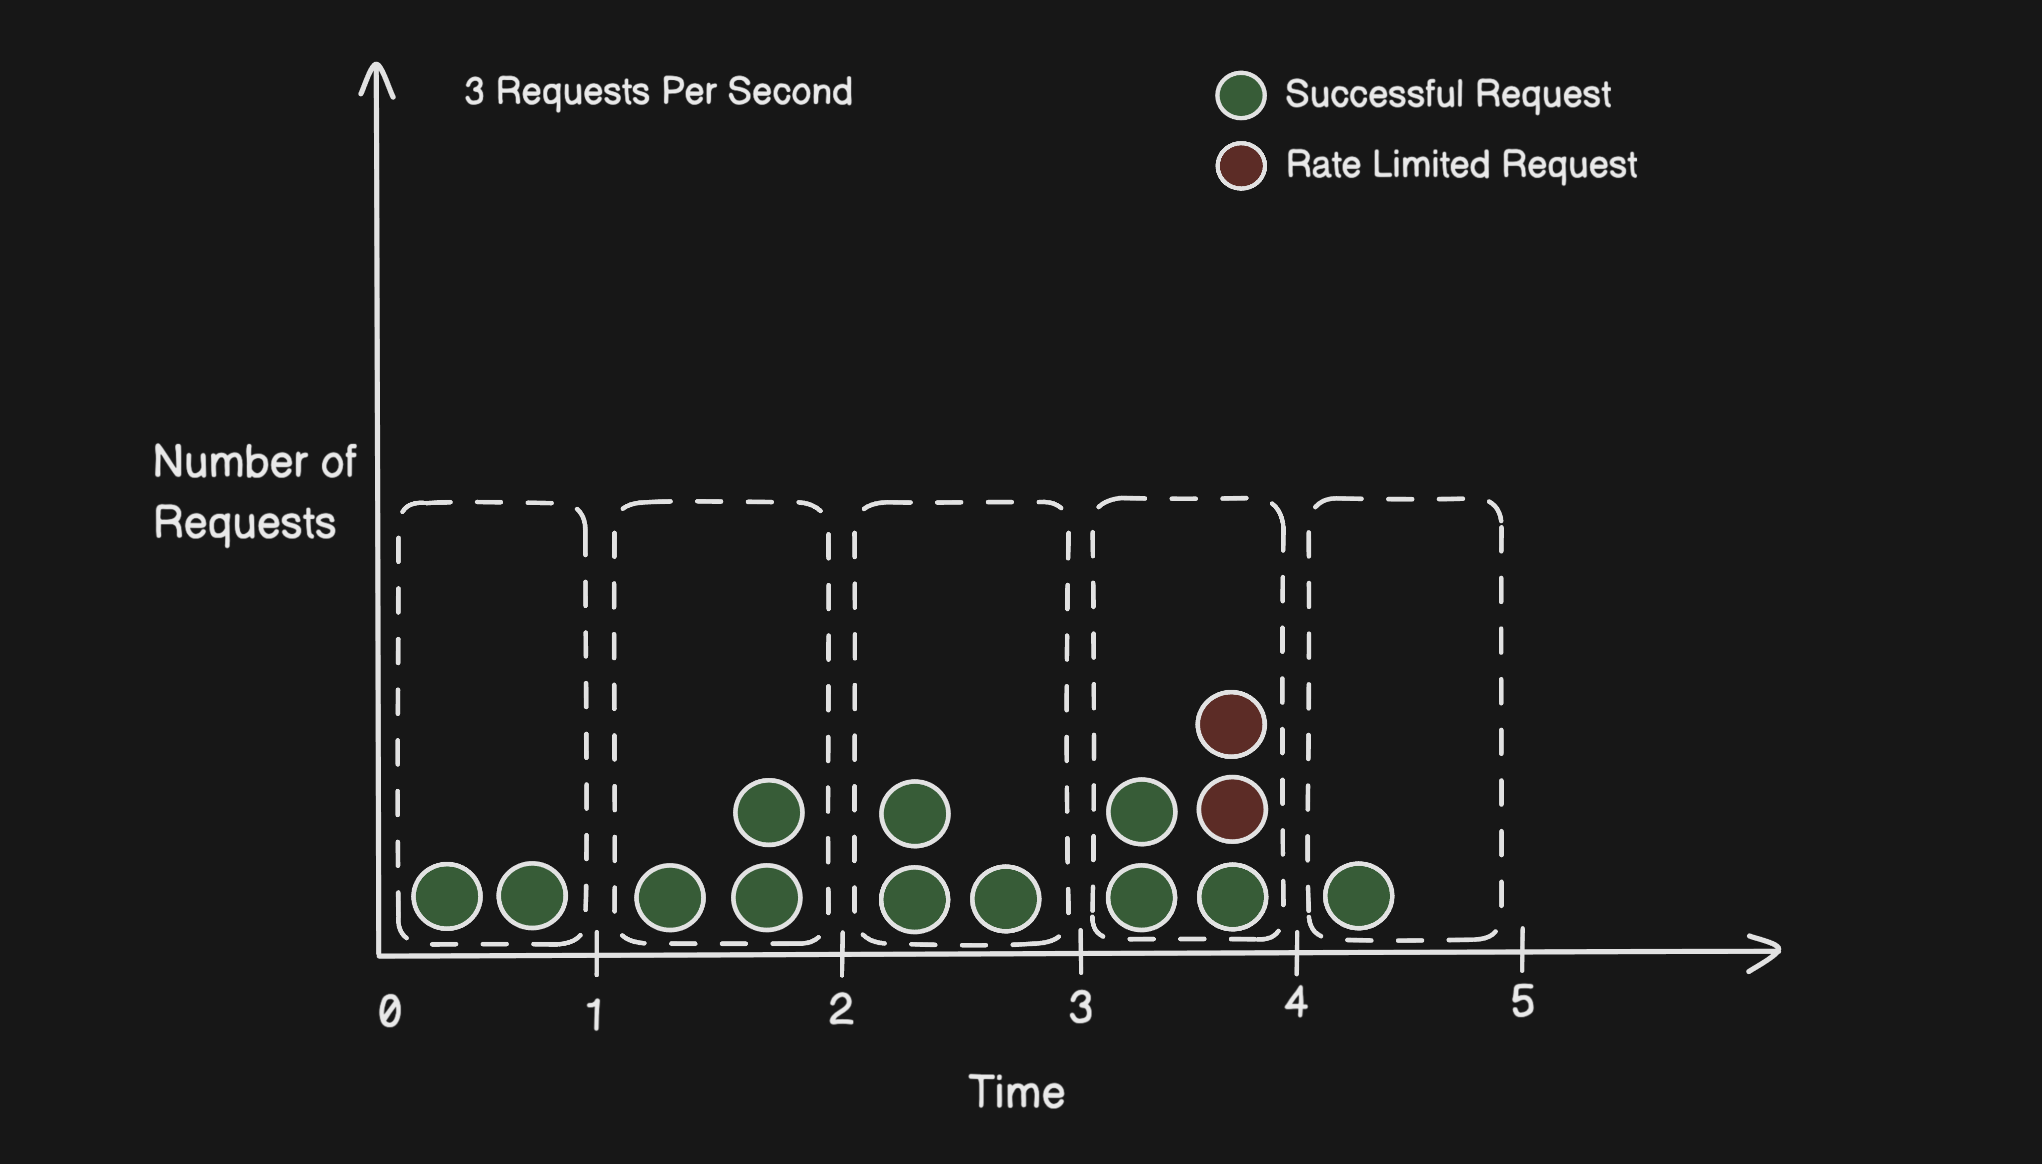
Clean, easy, barely any overhead. The problem is there's a real flaw in how the windows work.
Because the reset happens at a hard boundary, nothing stops a user from sending a full batch of requests right before the window ends and another full batch right after it starts. Both sets pass the check individually. But in real wall-clock time, you just let double your intended limit through in a fraction of a second.

That's not a theoretical edge case, it's something that can happen naturally with normal usage patterns, let alone someone exploiting it on purpose.
4. Sliding Window Log Algorithm
Sliding Window Log is a direct answer to the boundary problem. Instead of fixed reset points, it keeps a running log of timestamps for every request a user makes.
When a new request comes in, the algorithm trims any timestamps older than the window size (anything more than 1 second ago, for example), counts what's left, and makes a decision from there. If you're under the limit, the request goes through and its timestamp gets added to the log. If you're at the limit, 429.
Because the window always anchors to right now rather than a fixed clock boundary, there's no seam to exploit. The rate limit holds consistently no matter when requests arrive.
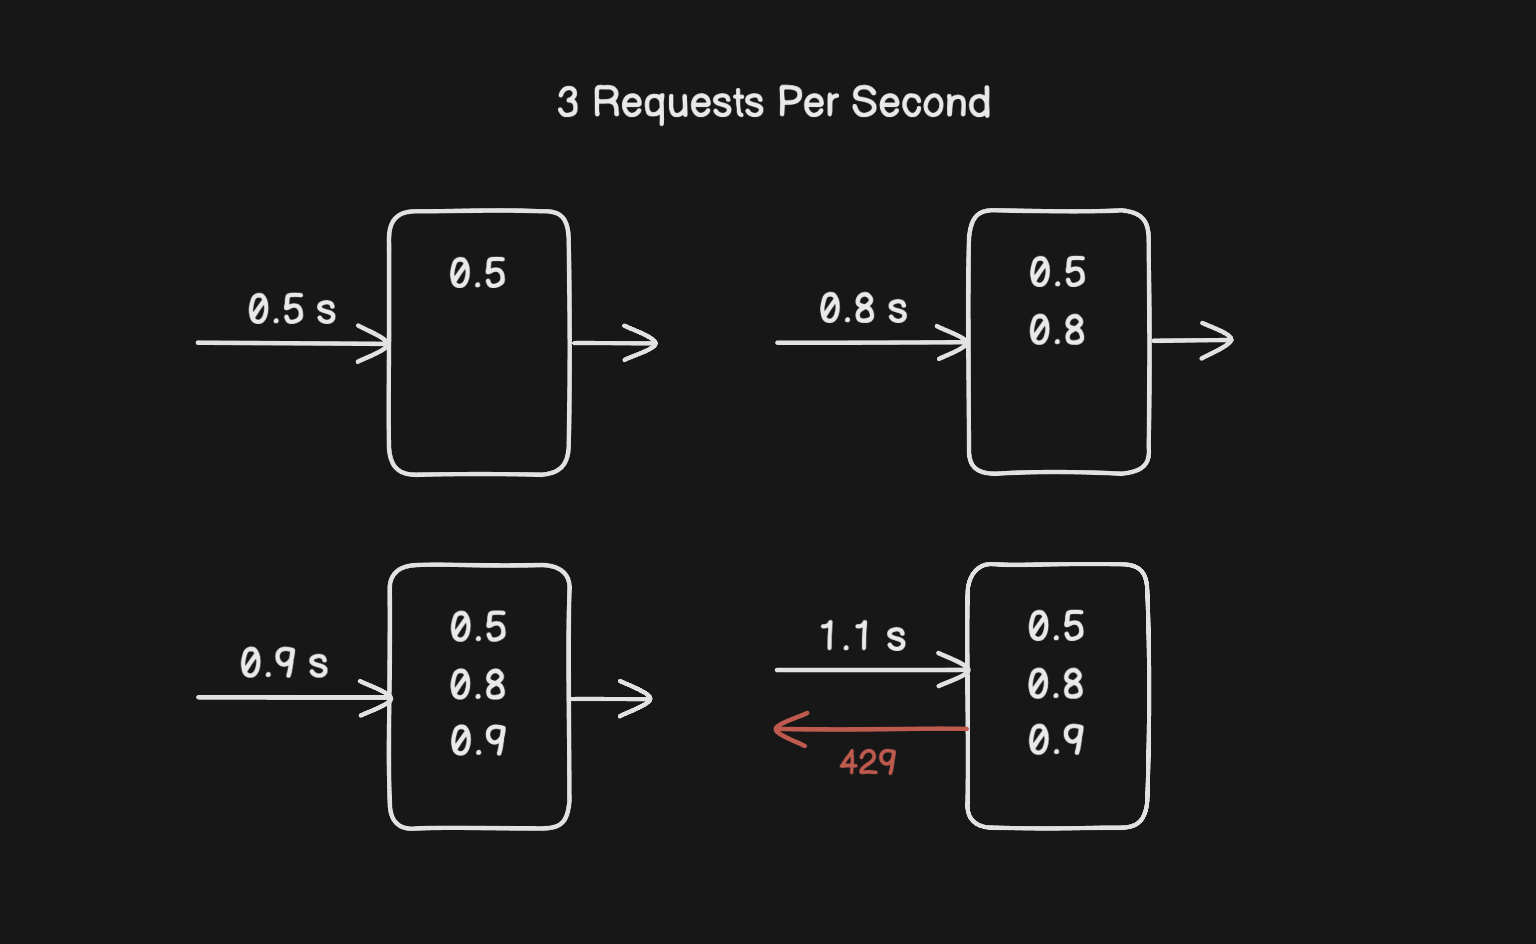
To make it concrete: say the limit is 3 per second and requests came in at t=0.5s, t=0.8s, and t=0.9s. A new request arrives at t=1.1s. The rolling window looks back to t=0.1s, all three timestamps are still inside it, so the log has 3 entries and the request is rejected.
Now say the request arrives at t=1.6s instead. The window now looks back to t=0.6s. The entry at t=0.5s is outside the window and gets evicted. The log has 2 entries, which is under the limit, so the request goes through.

The downside is memory. You're storing a timestamp for every single request usually kept in cache, such as sorted sets of Redis, which adds up fast if you have a lot of users or a high request volume.
5. Sliding Window Counter Algorithm
Sliding Window Counter is the practical middle ground. It gets most of the accuracy of Sliding Window Log without the memory cost of storing every timestamp.
The trick is using two fixed windows, the current one and the previous one — and combining them with a weighted calculation to approximate what the rolling window actually looks like.
The formula is:
approximate_count = (requests_in_previous_window × overlap_ratio) + requests_in_current_window
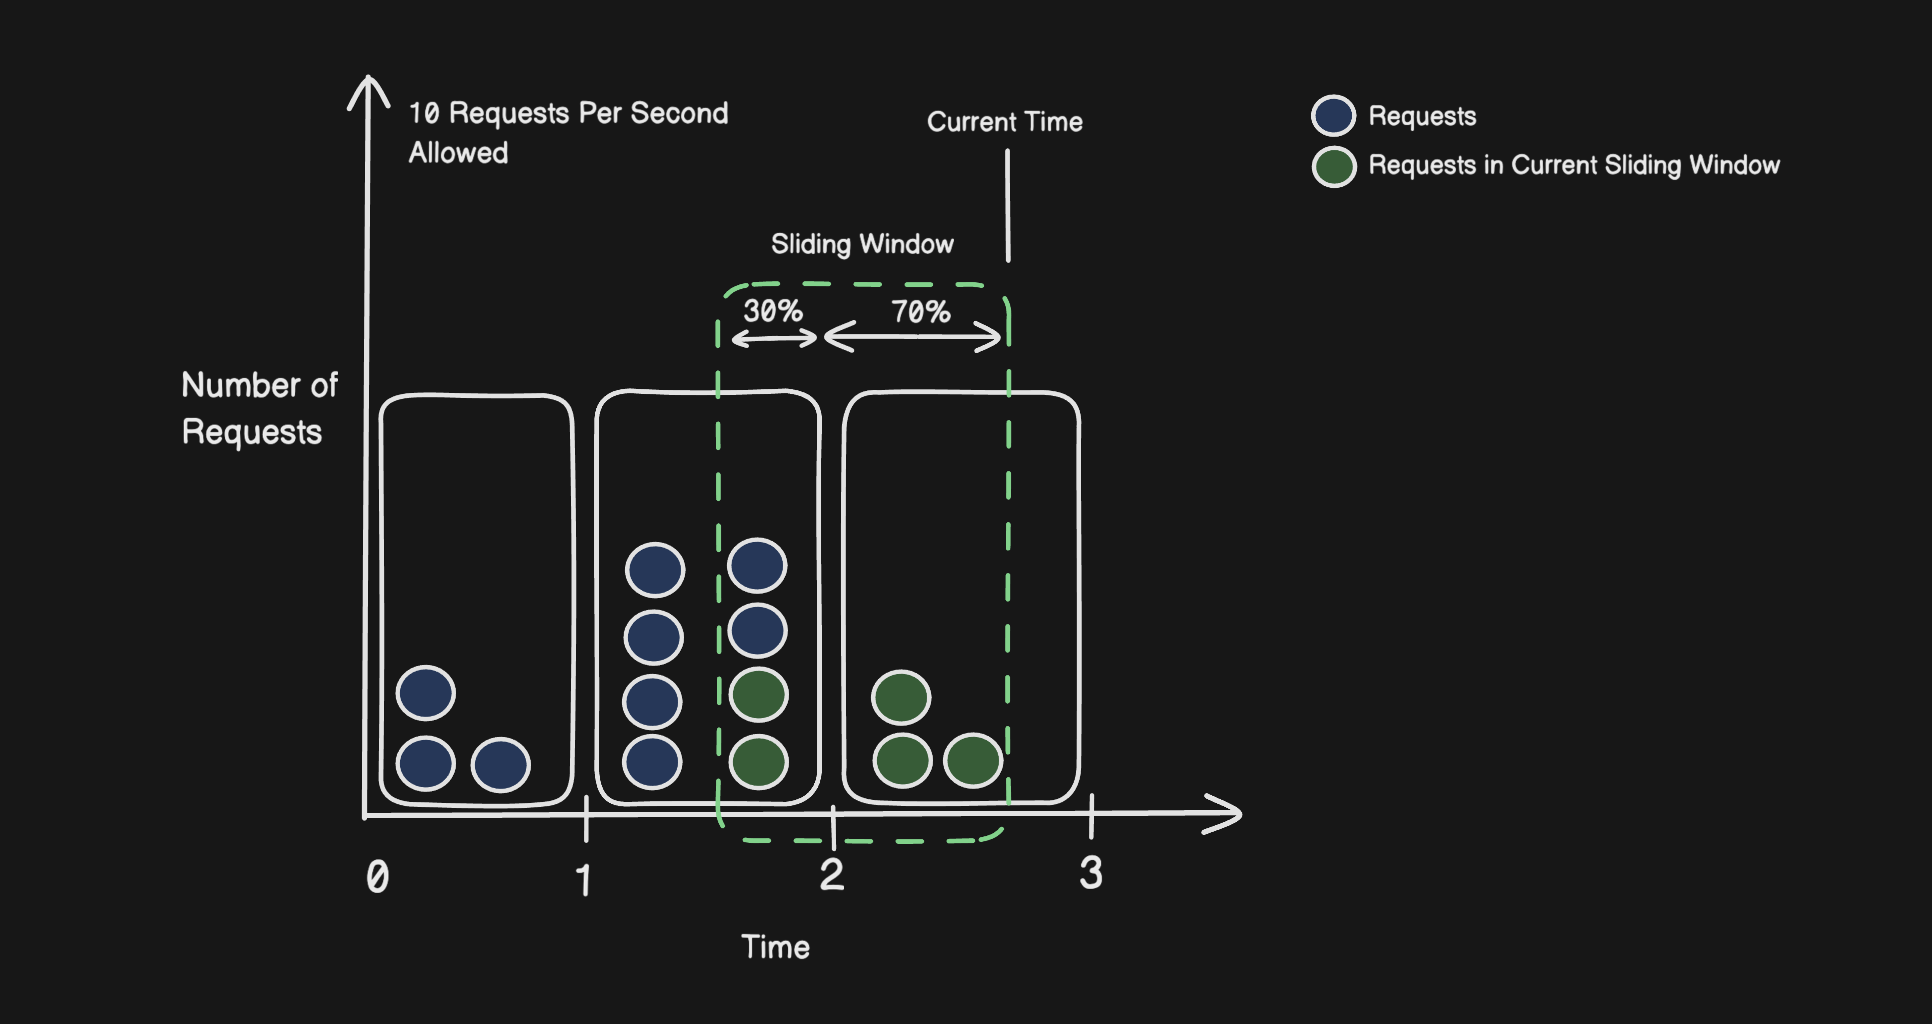
The overlap_ratio is just how much of the previous window is still inside your rolling window. If you're 70% through the current second, then 30% of the previous window still falls within the last second, so overlap_ratio = 0.3.
Here's a quick example. Previous window had 8 requests, current window has 3, and you're 70% through the current window:
approximate_count = (8 × 0.3) + 3 = 2.4 + 3 = 5.4
Request in the sliding window : 5
If the limit is 10, this request is fine. The benefit of this approach is that you only need two numbers per user instead of a full log, so memory stays low and the accuracy is good enough for almost every real-world scenario.
Summary
Rate limiting isn't just about blocking bad actors. It's about keeping your system predictable and available for everyone using it. Once you understand the trade-offs between these algorithms, you can make an informed decision instead of just grabbing whatever the docs recommend.
Whether you're rolling your own or configuring something like NGINX, AWS API Gateway, or a Redis-based solution, knowing what's happening underneath makes a real difference.